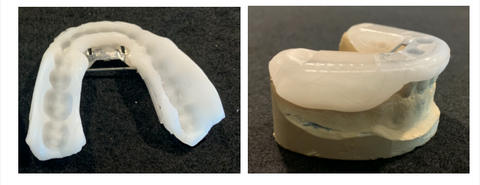
Security Bar
One of the features of an apnea device that is approved for Medicare code E0486 is that the device must "remain fixed in place during sleep so as to prevent dislodging the device".
The SnoreHook Splint complies with this criteria by providing for the application of the Security Bar.
These instructions are included within the Insturctions for Fabrication:
Secure the Security Bar in the Mandibular Splint. Using a rotary instrument cut two slots (or “ports”) into the occlusal/lingual edge of the finished mandibular splint (one on each side), 4mm distal from the edge of the CrossPlate. Cut to length, and place the Security Bar into the ports, with each end seated firmly within each port. Prepare heated Thermo-Acrylic to embed and secure the ends of the Security Bar within the ports. The provision of the Security Bar is essential to ensure that the hooking mechanism cannot become disengaged from the distal side of the CrossPlate during use.
Ensure Individual Splint Comfort. Each splint should first be assessed individually to ensure proper fit and comfort on the patient. If the splint’s fit is too tight or binding, gently “flame-brush” the internals with an alcohol torch (only a couple of passes is necessary) and then redeliver the device. The slightly softened Thermo-Acrylic will allow the splint to “glide” in. Remove and replace the splint several times as the material re-hardens.
Couple the Splints. Prior to inserting the splints, the devices are aligned together, with the maxillary splint rotated 45 degrees from the mandibular splint. The hooking mechanism is then inserted between the CrossPlate and Security Bar, and then the maxillary splint is rotated to be back in parallel alignment with the mandibular splint. The patient then inserts the devices together in their coupled configuration.